
Blog
The Ultimate Dry Skin Care Routine for Lasting Comfort
Transform your dry skin with our ultimate care routine. Learn how to hydrate, protect, and soothe your skin for lasting comfort and a healthy glow.

If your skin feels tight, flaky, or rough no matter what you do, you’re likely dealing with a compromised moisture barrier. The good news is that a few simple changes to your daily routine can restore lasting comfort. This article breaks down the causes of dry skin, the essentials you need, and a step-by-step routine to keep dryness at bay.

Courtesy of: allure.com
Key Takeaways
- Apply moisturizer to damp skin within a few minutes after showering to lock in moisture.
- Use a gentle, hydrating cleanser that doesn’t foam or strip natural oils.
- Keep showers lukewarm and under ten minutes to avoid stripping the skin barrier.
- Incorporate occlusives, humectants, and emollients like ceramides, glycerin, and petrolatum.
- Consult a dermatologist if you experience severe itching, cracking, or signs of infection.
What Causes Dry Skin and How to Fix It
Dry skin happens when the outer layer loses both water and oil, which weakens the barrier that normally holds moisture in. That is why tightness, flaking, and rough patches show up together rather than one at a time. Cold weather, low humidity, wind, and long hot showers all speed up the water loss. The fix is not one miracle product but a routine: hydrate daily, cleanse gently, and stop stripping the barrier faster than you can repair it.
Essential Products for Your Dry Skin Routine

Photo credit: btime.om
You need fewer products than you think, but the right ones. Anything that foams hard or smells strongly is a bad sign for a dry barrier.
- Gentle, hydrating cleanser: a cream or lotion formula that cleans without squeaking, so it leaves natural oils in place.
- Thick, emollient-rich moisturizer: a cream or ointment texture, not a lotion, because it seals hydration in and fills gaps in the barrier.
- Humidifier: adds moisture to dry indoor air, especially in winter or in air-conditioned rooms.
- Soft towel: a smooth, absorbent one so you can pat dry instead of dragging fabric across irritated skin.
Step-by-Step: Your Daily Dry Skin Care Routine

Image credit: treasuredlocks.com
Order and timing matter more than the number of steps. The whole routine takes about two minutes after a shower.
- Shorten and cool the water: keep showers lukewarm and under about ten minutes. Hot water strips oils fast, so warm is the compromise that still feels good.
- Cleanse gently: apply the hydrating cleanser with your hands, skip washcloths and scrubs, and rinse well. You are cleaning skin, not stripping it.
- Pat, don’t rub: step out and press the soft towel against your skin until it is damp, not fully dry. Rubbing creates friction that irritates a compromised barrier.
- Moisturize within a few minutes: apply the thick cream to skin that is still damp. Water on the surface gets sealed under the product instead of evaporating, which is the single biggest lever you have.
- Repeat on hands and body: the same damp-skin rule applies after every hand wash. Keep a tube by the sink so it actually happens.
Common Dry Skin Mistakes to Avoid
Most stubborn dryness is not a product problem, it is a habit problem. These four keep the barrier from recovering no matter what you buy.
- Harsh soaps and cleansers: sulfates and deodorant bar soaps strip oils in seconds. A creamy, fragrance-free cleanser does the same job without the tight feeling afterward.
- Long, hot showers and baths: heat and time both pull moisture out of the outer layer. Shorter and lukewarm keeps the comfort without the dehydration.
- Over-exfoliating: acids and scrubs more than once or twice a week can thin the barrier and make flaking worse, not better. If skin stings after exfoliating, you have gone too far.
- Strong fragrances and alcohol: both are common irritants on dry, sensitive skin. Check the ingredient list, not just the front label.
Expert Tips for Managing Persistent Dry Skin

Source: levoit.com
When the basics stop being enough, these four habits make the difference between managing dryness and constantly fighting it.
- My tip: Run a humidifier in your bedroom during dry seasons. Moist air can help slow water loss from skin overnight, and you wake up less tight and flaky.
- My tip: Wear gloves in cold, windy weather. Hands lose moisture fast, and a pair of soft gloves protects the barrier before it cracks.
- Tip: Patch test any new product on a small area first. Dry skin is often sensitive, and a quick test can spare you a reaction.
- Good to know: Look for ceramides, hyaluronic acid, and petrolatum on the label. Ceramides fill gaps in the barrier, hyaluronic acid attracts water, and petrolatum seals it in.
Preventing Dry Skin from Returning
Keeping dryness away is mostly about consistency. A routine you repeat daily, even on busy mornings, does more than an occasional deep treatment.
- Stick to the same daily steps: cleanse gently, moisturize damp skin, and repeat every morning and night. Skipping days lets the barrier weaken again.
- Swap products with the seasons: use richer creams and ointments in cold months, and lighter lotions when it warms up.
- Drink water through the day: it supports overall skin health, though how much it affects surface dryness is debated.
- Shield your skin outdoors: gloves, a scarf, and sunscreen protect against wind, cold, and sun that pull moisture out.
When to Consult a Dermatologist for Dry Skin
Most dryness responds to a good routine within a few days to a week. Some signs mean it is time to let a dermatologist take a look.
- Severe symptoms: intense itching, deep cracking, or bleeding that does not settle with moisturizer.
- Signs of infection: spreading redness, warmth, swelling, or pus around cracked areas.
- No improvement: over-the-counter products have not helped after consistent use.
- Daily impact: dryness disturbs your sleep, focus, or comfort enough to affect your quality of life.
A dermatologist can check whether something beyond simple dryness is involved and suggest a plan that fits your skin.
Frequently Asked Questions
What’s the difference between dry skin and dehydrated skin?
Dry skin is a skin type that lacks oil, leading to a compromised barrier. Dehydrated skin is a temporary condition that lacks water and can affect any skin type, even oily skin. Dry skin feels tight and rough, while dehydrated skin may feel tight but also look dull or show fine lines. Both benefit from proper hydration and moisturizing.
Can diet impact my dry skin?
Staying hydrated by drinking water supports overall skin health, but its direct effect on surface dryness is debated. A balanced diet with healthy fats (like omega-3s) may help the skin barrier, but it’s not a substitute for a good topical routine. If you have persistent dryness, focus on consistent moisturizing and consult a dermatologist for severe cases.
How often should I exfoliate if I have dry skin?
Exfoliate no more than once a week, and only if your skin isn’t irritated. Over-exfoliation damages the barrier and worsens dryness. Stick to gentle chemical exfoliants like lactic acid or polyhydroxy acids, and avoid abrasive physical scrubs. Always follow with a rich moisturizer on damp skin.
Are natural oils good for dry skin?
Some natural oils, like jojoba or squalane, can help seal in moisture, but not all are safe for dry skin. Oils with fragrance or essential oils may irritate sensitive skin. Patch test any new oil on a small area first. For best results, use oils as part of a complete moisturizing routine, not alone.
When is the best time to apply body lotion?
Apply body lotion immediately after showering or bathing, while your skin is still damp (within a few minutes). This locks in moisture from the water and helps the product absorb better. Avoid applying to completely dry skin, as it won’t be as effective. Reapply during the day if your skin feels tight.
Final Thoughts
For lasting comfort, stick with a consistent daily routine: cleanse gently, moisturize damp skin, and protect from harsh weather. You should start seeing improvement within a few days to a week, but the real payoff comes from making these habits second nature. Your skin will thank you for the steady care.
This article provides general information for managing dry skin and is not a substitute for professional medical advice. If you have severe symptoms like intense itching, cracking, bleeding, or signs of infection, please consult a dermatologist or healthcare provider for personalized care.
Blog
How to Organize Your Life: A Simple and Effective Approach
Learn how to organize your life with practical decluttering steps and effective methods. Discover tips to create lasting order and maintain a tidy home.
Feeling like your home and schedule are running you, instead of the other way around? You’re not alone. The good news is that organizing your life doesn’t require a total overhaul or a perfectly tidy house. This article walks you through a practical, step-by-step plan to declutter your space and create simple routines that stick, so you can finally feel in control.

Courtesy of: alliborganizing.com
Key Takeaways
- Declutter by category (like clothes or books) rather than by room to avoid feeling overwhelmed.
- Give every item a designated home and label it so you always know where things belong.
- Use vertical storage like shelves and drawer dividers to double or triple usable space.
- Follow the one-in, one-out rule to prevent new clutter from piling up.
- Schedule short daily tidy-up sessions (even 15 minutes) instead of marathon cleaning days.
Start Organizing Your Life Today: A Simple Approach
Organizing your life means creating systems for both your physical spaces and your daily routines. Focus on consistent, small steps rather than trying to tackle everything at once. My tip: prioritize decluttering by category, not by room, to avoid feeling overwhelmed and build momentum.
Essential Tools and Supplies for Organizing Your Home

Photo credit: bedbathandbeyond.com
Start with the right tools to set yourself up for success:
- Storage bins and baskets: Contain items and define clear zones.
- Shelving units: Maximize vertical storage and free up floor space.
- Drawer dividers: Keep small items sorted and accessible.
- Labels and a label maker: Make finding and returning items easy.
- Filing cabinets or accordion folders: Manage documents without piles.
- Donation bags and boxes: Have them ready as you declutter.
- A shredder: Dispose of sensitive documents securely.
- Basic cleaning supplies: Tidy as you go for a fresh start.
Your Step-by-Step Guide to Decluttering and Organizing

Image credit: hammerandaheadband.com
Follow these steps to declutter and organize your home systematically. Start with the area you use most and that causes the most daily frustration, like your entryway, kitchen counter, or desk. Clearing this spot first gives you immediate relief and motivation to keep going.
- Start with a high-impact area: Pick the spot that frustrates you most each day, such as your entryway, kitchen counter, or desk. Clearing it provides immediate relief and builds momentum.
- Declutter by category: Use the KonMari method: tackle clothes, then books, papers, miscellany, and sentimental items. Sorting by category prevents bouncing between rooms and losing focus.
- Use the four-box method: Label boxes ‘keep’, ‘donate/sell’, ‘trash’, and ‘relocate’. Place every item into one box to make decisions final and clear.
- Designate a home for each item: Once you decide to keep something, assign it a specific spot. If it doesn’t have a home, it will end up in a pile.
- Implement vertical storage: Use shelves, wall hooks, and stackable bins to maximize vertical space. This can double or triple usable storage in a given area.
- Create a landing strip: Set up a small station near your entrance for keys, mail, and bags. This simple habit prevents daily clutter from spreading through your home.
- Involve your family: Assign tasks and let everyone choose how to organize their own spaces. When everyone participates, the system is more likely to stick.
Effective Organizing Methods to Keep Your Home Tidy

Source: xda-developers.com
Several proven methods can help you maintain an organized home. Here are the most effective ones:
KonMari Method
Declutter by category, keeping only items that ‘spark joy’. This emotional check makes it easier to let go of things you no longer need. Tip: Start with clothes, as the joy test is clearest there.
One-in, One-out Rule
For every new item you bring home, discard one old one. This prevents accumulation and forces you to evaluate purchases. Caution: Apply this rule consistently for it to work.
Four-Box Method
Sort items into ‘keep’, ‘donate/sell’, ‘trash’, and ‘relocate’. This simple sorting system removes ambiguity and speeds up decisions. Tip: Move the ‘relocate’ box to its destination within 24 hours.
20/20 Rule
If you can replace an item for under $20 and in under 20 minutes, you can let it go if you haven’t used it recently. This rule helps release items kept ‘just in case’.
Digital Organization
Apply the same principles to your digital life: declutter files and emails by category, use folders and labels, and archive or delete what you don’t need. A clean digital space supports a clear physical one.
Common Organizing Mistakes and How to Avoid Them
Organizing an entire room at once: This leads to burnout. Instead, tackle a single drawer, shelf, or corner. Momentum builds from small wins, not from clearing a whole space in one afternoon.
Buying storage before decluttering: Bins and baskets fill up fast with items you don’t need. Declutter first, then measure what you have and choose containers that fit what remains.
Keeping items out of guilt: A gift you never use or a hand-me-down you dislike doesn’t serve you. Keep only what you genuinely need or love. Letting go creates space for what matters.
Working alone: If others live with you, their items and habits affect the system. Involve them from the start so everyone agrees on where things belong and how to maintain order.
Ignoring digital clutter: Overflowing email inboxes and scattered files add mental weight. Dedicate 15 minutes each week to delete, archive, and organize digital files and emails.
Smart Tips for Maintaining an Organized Home and Schedule

Label everything: Clear labels on containers and shelves tell you exactly where an item lives and where to return it. This cuts down on misplaced objects and saves time searching.
Batch similar tasks: Run all errands in one trip, reply to emails in one block, and fold laundry in one session. Grouping related activities reduces start-up time and keeps your schedule tidy.
Set realistic goals: Aim to clear one shelf per day, not the whole closet. Celebrate each small win to keep motivation high. A completed drawer is still progress.
Review your systems regularly: Every few months, check if your storage and routines still fit your life. Adjust as your needs change rather than forcing a system that no longer works.
Prioritize short sessions: Spend 15 minutes daily on a quick declutter or reset. Short, consistent efforts beat a full-day marathon that leaves you exhausted and less likely to repeat it.
How to Prevent Clutter from Creeping Back into Your Home
Preventing clutter is easier than fixing it. These habits keep order in place long after the initial organizing session.
Follow the one-in, one-out rule: For every new item you bring into your home, remove one similar item. This stops accumulation before it starts.
Give everything a home: Every object needs a designated spot where it lives when not in use. When you finish using something, return it to its home immediately.
Build a daily tidy-up habit: Spend 5 to 10 minutes each evening putting things back in their places. A quick reset prevents small messes from growing.
Schedule a deeper declutter every three to six months: Set aside a few hours to reassess what you own. Between these sessions, a 15-minute daily tidy or weekly sweep stops things from piling up again.
Digitize documents: Scan paper bills, receipts, and manuals, then recycle the originals. Store files in clearly named folders on cloud storage for easy access without physical clutter.
Timeline and Investment for an Organized Life
The time and cost of organizing vary widely. Here is what to expect.
Timeline: A full home declutter and organize can take several weeks to a few months, depending on the amount of stuff and your available time. Daily or weekly maintenance is ongoing and takes about 15 to 30 minutes per session.
Cost tiers: Low cost means using containers and supplies you already own. Medium cost covers basic storage solutions like bins, drawer dividers, and shelving units. High cost involves hiring a professional organizer or installing custom closet systems.
Frequently Asked Questions
How do I start organizing when I feel overwhelmed?
Begin with the smallest, most visible area you can finish in 15 minutes, like a junk drawer or a nightstand. Clearing that one spot gives you a quick win and builds momentum. Avoid looking at the whole room at once; focus on one category or corner at a time.
How often should I declutter my home?
Plan a deeper declutter session every three to six months to reassess what you own. In between, a 15-minute daily tidy-up or a weekly sweep prevents things from piling up again. The key is consistency, not perfection.
Can I organize my digital life too?
Absolutely. Digital organization is just as important as physical organization. Use cloud storage for important files, delete or archive old emails, and create a simple folder system on your computer. Batch similar digital tasks, like unsubscribing from newsletters, to save time.
What are the best storage solutions for small spaces?
Vertical storage is your friend. Install shelves on walls, use over-the-door organizers, and choose furniture with built-in drawers or compartments. Clear bins and drawer dividers help you see and access items without digging. Always measure your space before buying anything.
Where do I start organizing my house?
Start with the area you use most and that causes the most daily frustration, like your entryway, kitchen counter, or desk. A visible, high-traffic spot gives you immediate relief and motivation. Once that space works, move to the next small zone.
Final Thoughts
Start with one visible spot, like a single drawer or shelf, and build from there. Expect the initial process to take weeks or months depending on your home, but the daily or weekly maintenance that follows is what keeps order in place. A little consistency goes a long way toward a more peaceful, organized life.
Blog
12 Collagen-Rich Foods for Glowing Skin
Discover 13 collagen-rich foods and nutrients that can naturally support your skin’s health and elasticity. Learn how diet impacts collagen production.
You already know that your skin loses collagen starting in your mid-20s, dropping by about 1 percent each year. That natural decline is something you can’t stop, but you can absolutely support your body’s own collagen production through the foods you eat. This article covers the 12 most effective collagen-friendly foods, plus the key nutrients that help your body build and protect this essential protein.
Think of it like fueling a machine: your body needs specific raw materials to make collagen, and the right diet delivers exactly those building blocks. Here’s what actually works.

Courtesy of: delightfulmomfood.com
Key Takeaways
- Vitamin C is essential for collagen synthesis; eat citrus, berries, and bell peppers daily.
- Amino acids like glycine and proline are the building blocks; get them from eggs, chicken, and legumes.
- Zinc and copper from nuts, seeds, and fish are necessary co-factors for collagen production.
- Antioxidants in berries, leafy greens, and tomatoes help protect existing collagen from damage.
- Expect visible skin improvements from dietary changes in several weeks to a few months of consistent effort.
Boost Your Skin’s Collagen Naturally Through Diet
Collagen is the protein that gives skin its structure, and your body starts making less of it in your mid-20s, dropping by roughly 1% a year. You cannot stop that, but you can feed the process. Your body builds collagen from amino acids like glycine and proline, and it needs Vitamin C, zinc, and copper as co-factors to do it. A balanced diet with those nutrients supports your own collagen production, which many people find shows up as firmer, more elastic skin.
1. Citrus Fruits

Photo credit: apleasantlittlekitchen.com
Oranges, grapefruits, and lemons are packed with Vitamin C, and that matters more than most people realize. Vitamin C acts as a co-factor for the enzymes your body uses to build collagen, so without enough of it, the raw amino acids have nothing to assemble them.
My tip: Start your day with a glass of lemon water, or add citrus segments to your salads for a refreshing boost. Use the zest too, since it carries flavor without extra juice.
2. Berries
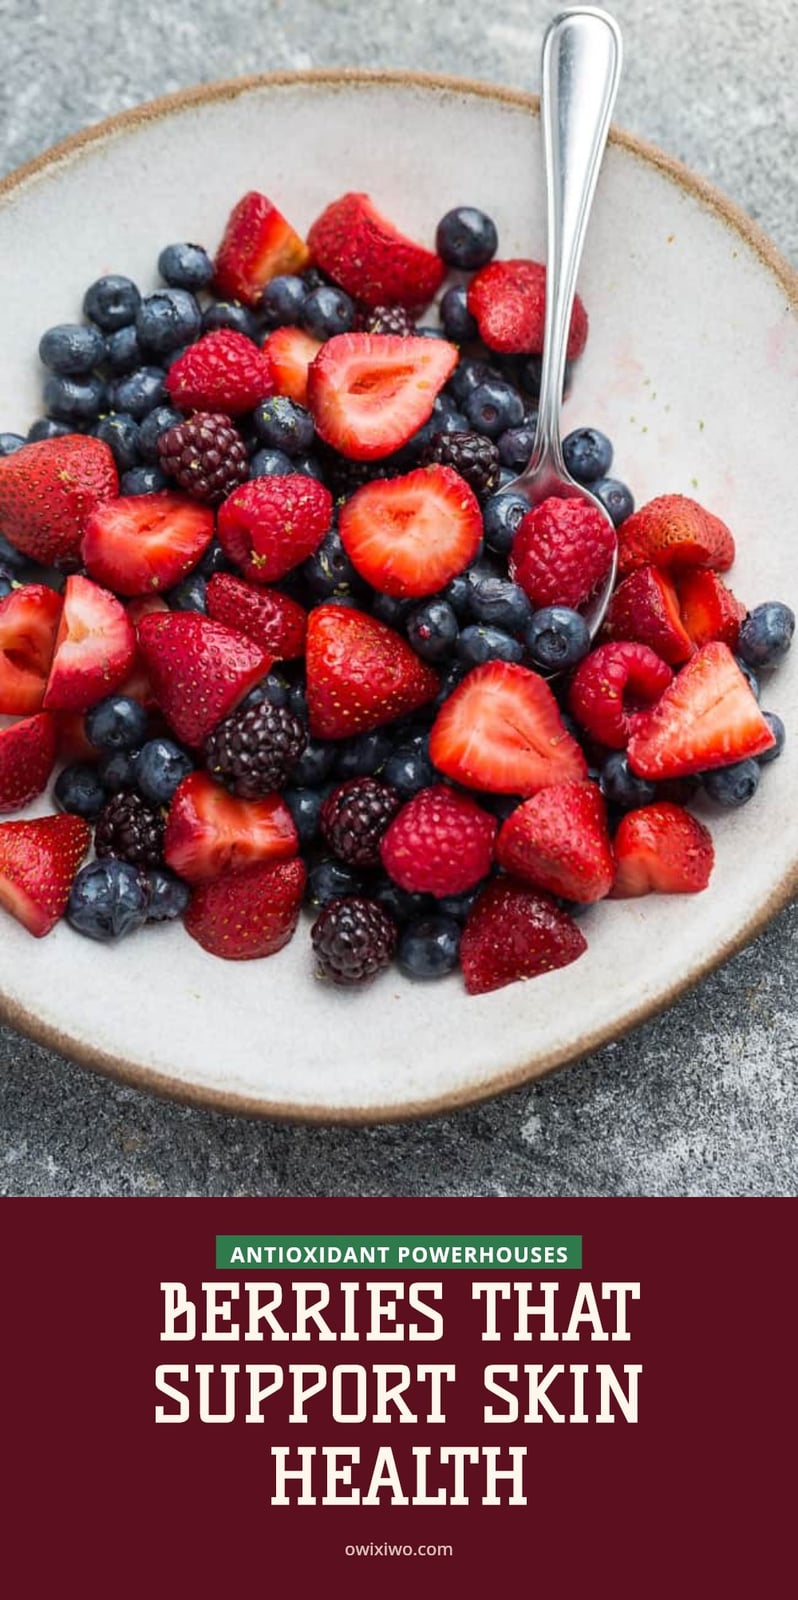
Image credit: lifemadesweeter.com
Strawberries, blueberries, and raspberries deliver Vitamin C plus a solid dose of antioxidants. The Vitamin C supports new collagen synthesis, while the antioxidants help protect the collagen you already have from free radical damage, which can leave skin looking firmer over time.
- Add a handful to plain yogurt or oatmeal.
- Keep a bag of frozen berries for smoothies, since freezing preserves most of the nutrients.
- Choose fresh berries without added sugar syrups.
3. Leafy Green Vegetables
Spinach, kale, and other leafy greens are excellent sources of Vitamin C and a range of other antioxidants. Together these nutrients support collagen production and help shield skin from environmental stressors like pollution and UV exposure.
- Toss a handful of spinach into soups and sauces at the end of cooking to keep more Vitamin C intact.
- Massage kale with a little olive oil to soften it for raw salads.
- Rotate greens through the week so you are not eating the same one daily.
4. Bell Peppers

Source: savorynothings.com
Red and yellow bell peppers pack more Vitamin C per gram than oranges. A single medium red pepper provides over 150% of the daily recommended intake. That Vitamin C directly fuels the enzymes your body needs to build collagen. Peppers also contain capsaicin, which has anti-inflammatory properties that can indirectly support skin health by reducing chronic inflammation that degrades collagen over time.
5. Tomatoes
Tomatoes give you Vitamin C and lycopene, a potent antioxidant that helps protect skin from sun damage. Since UV exposure is a major cause of collagen breakdown, that protection matters. Cooking tomatoes actually increases lycopene absorption, so sauces, soups, and stewed tomatoes are especially effective. Add them to pasta sauce or chili for a double benefit.
6. Garlic

Via filareefarm.com
Garlic delivers sulfur, a mineral your body needs to synthesize collagen. It also contains lipoic acid and taurine, two compounds that may help rebuild damaged collagen fibers. My tip: Add extra garlic to stir-fries, roasted vegetables, or salad dressings. Crush it and let it sit for 10 minutes before cooking to maximize the beneficial compounds.
7. Eggs

Courtesy of: sohappyyoulikedit.com
Egg whites are one of the richest food sources of proline, an amino acid your body uses as a building block for collagen. The yolk adds healthy fats and nutrients like vitamin D that support overall skin health. Eat the whole egg for the best balance. A hard-boiled egg makes a quick, portable snack that supports your collagen production.
8. Fish and Shellfish
Salmon, tuna, and other fatty fish supply amino acids your body uses to build collagen, plus zinc and copper, two minerals that act as essential co-factors in the process. The omega-3 fatty acids in fish also help reduce skin inflammation, which indirectly protects existing collagen. Aim for two servings of fish per week, grilled or baked, to get these nutrients without added oils that can cause inflammation.
9. Bone Broth

Photo credit: therealfooddietitians.com
Bone broth is a popular way to get amino acids like glycine and proline that your body can use to build collagen. The exact content varies widely depending on simmering time and the bones used, chicken feet or beef knuckles simmered for 12-24 hours tend to release more. Use it as a base for soups or sip it warm for a comforting, nourishing addition to your routine.
10. Chicken
Chicken, especially the skin and connective tissues, provides amino acids like glycine and proline that your body uses to build its own collagen. A chicken thigh with skin or a drumstick offers these building blocks. Roast or braise chicken with the skin on, and include the cartilage near the joints for extra glycine and proline.
11. Legumes
Beans, lentils, and chickpeas are strong plant-based sources of the amino acids proline and lysine, both vital for collagen production. They also deliver fiber and other nutrients that support overall health, which indirectly benefits skin. Add a serving of legumes to soups, salads, or grain bowls a few times a week.
12. Nuts and Seeds
Almonds, cashews, and pumpkin seeds deliver zinc and copper, two minerals your body depends on for collagen synthesis. Without enough zinc, the enzymes that build collagen can’t function properly. Copper helps cross-link collagen fibers, giving skin its strength.
These nuts and seeds also contain Vitamin E, an antioxidant that protects skin cells from oxidative damage. A handful of almonds or a tablespoon of pumpkin seeds makes an easy snack that supports both collagen production and collagen preservation.
Common Misconceptions About Collagen and Diet
Myth: Eating collagen sends it straight to your skin. Your digestive system breaks dietary collagen down into individual amino acids. Your body then uses those amino acids wherever it needs new protein, including collagen, but not as a direct transfer.
Myth: Results happen overnight. Dietary changes take consistent effort. Noticeable improvements in skin health typically require several weeks to a few months.
Myth: Amino acids alone are enough. Without Vitamin C, zinc, and copper, your body cannot assemble collagen properly. These co-factors are non-negotiable.
Myth: Supplements are a shortcut. Supplements can help, but a holistic approach matters more. A nutrient-rich diet, adequate hydration, and sun protection work together for long-term skin health.
Frequently Asked Questions
Can I get enough collagen from food alone?
Yes, you can get the amino acids and co-factors your body needs for collagen synthesis from a well-rounded diet. Foods like eggs, chicken, fish, legumes, and plenty of Vitamin C-rich fruits and vegetables provide everything your body uses to make collagen. Supplements are not necessary if you consistently eat a variety of these foods.
Are collagen supplements better than food sources?
Not necessarily. Your digestive system breaks down both dietary collagen and supplements into individual amino acids, so the body uses them the same way. Whole foods also provide additional nutrients like antioxidants, zinc, and copper that supplements may lack. Focus on food first and consider supplements only as a convenience, not a superior option.
What lifestyle factors affect collagen production?
Excessive sun exposure, smoking, and a high-sugar diet all accelerate collagen breakdown. UV damage is a major cause of collagen degradation, while sugar contributes to advanced glycation end products that stiffen collagen fibers. Staying hydrated, protecting your skin from the sun, and avoiding smoking are just as important as diet.
Do plant-based diets support collagen synthesis?
Yes, plant-based diets can support collagen production by focusing on legumes, nuts, seeds, and plenty of Vitamin C-rich fruits and vegetables. Beans and lentils provide proline and lysine, while leafy greens and bell peppers deliver Vitamin C. You may need to be more intentional about getting enough zinc and copper from sources like pumpkin seeds and almonds.
How long does it take to see results from diet changes?
Noticeable improvements in skin health from dietary changes typically take several weeks to a few months of consistent effort. Your body needs time to absorb the nutrients, synthesize new collagen, and repair existing tissue. Be patient and stick with a balanced diet rather than expecting overnight changes.
Final Thoughts
My tip: Build your meals around at least two or three of these foods every day, and pair them with a Vitamin C source to maximize absorption. Realistic expectations matter here, dietary changes take several weeks to a few months to show noticeable improvements in skin firmness and elasticity. Support your body’s natural collagen production, protect what you already have with sun protection and hydration, and your skin will thank you over time.
This article is for general informational purposes only and does not constitute medical or professional advice. Individual results may vary. If you have a persistent skin concern, an underlying health condition, or are considering making significant dietary changes, please consult a healthcare professional or dermatologist.
Blog
19 Highlights 2027 for Dimension
Highlights 2027 are the perfect way to add dimension to your hair. See 19 blended caramel blonde highlights and honey blonde options for dark brown hair.
Highlights are still the go-to way to add dimension to hair without changing your base color entirely. The current trend leans toward softer, face-framing placement and lived-in tones that grow out naturally, rather than uniform stripes.
This collection of 19 ideas covers the spectrum from low-maintenance balayage to more defined contrast, suited for different lengths, textures, and densities. Whether your fine hair needs visual volume or your thick curls want a lighter feel, there is a version here that works. No more guessing which highlight style fits your wash-day rhythm.
Mid-Back Waves With Blonde Highlights

Courtesy of: fabmood.com
The genius of this look is how the long layers and curtain bangs work with the blonde highlights on a medium brown base: the lighter pieces catch the waves, while the face-framing strands brighten the front without a full commitment to blonde. It’s a lived-in color, not a fresh-out-of-the-salon one, which is exactly why it reads as natural.
This suits thick, wavy hair that starts at mid-back, and the curtain bangs are a forgiving choice for round and heart faces. Ask your colorist for: medium brown base with lived-in blonde highlights, curtain bangs. To style, use a large barrel curling iron for soft waves; the curtain bangs will need a trim every 4 to 6 weeks to keep their shape.
Dark Brown With Caramel And Blonde Highlights

Photo credit: therighthairstyles.com
Where single-tone highlights add a uniform lift, this dark brown base with blonde and caramel highlights builds depth in layers: the caramel warms the mid-lengths while the blonde pops at the ends. The result is a dimensional finish that moves with the waves.
This style works well for thick, wavy hair. The curtain bangs soften round and heart faces. Ask your colorist for: dark brown with blonde and caramel highlights, curtain bangs. A smoothing serum keeps the shine, and a trim every 6 to 8 weeks maintains the shape.
Shoulder Length Dark Brown With Blended Highlights
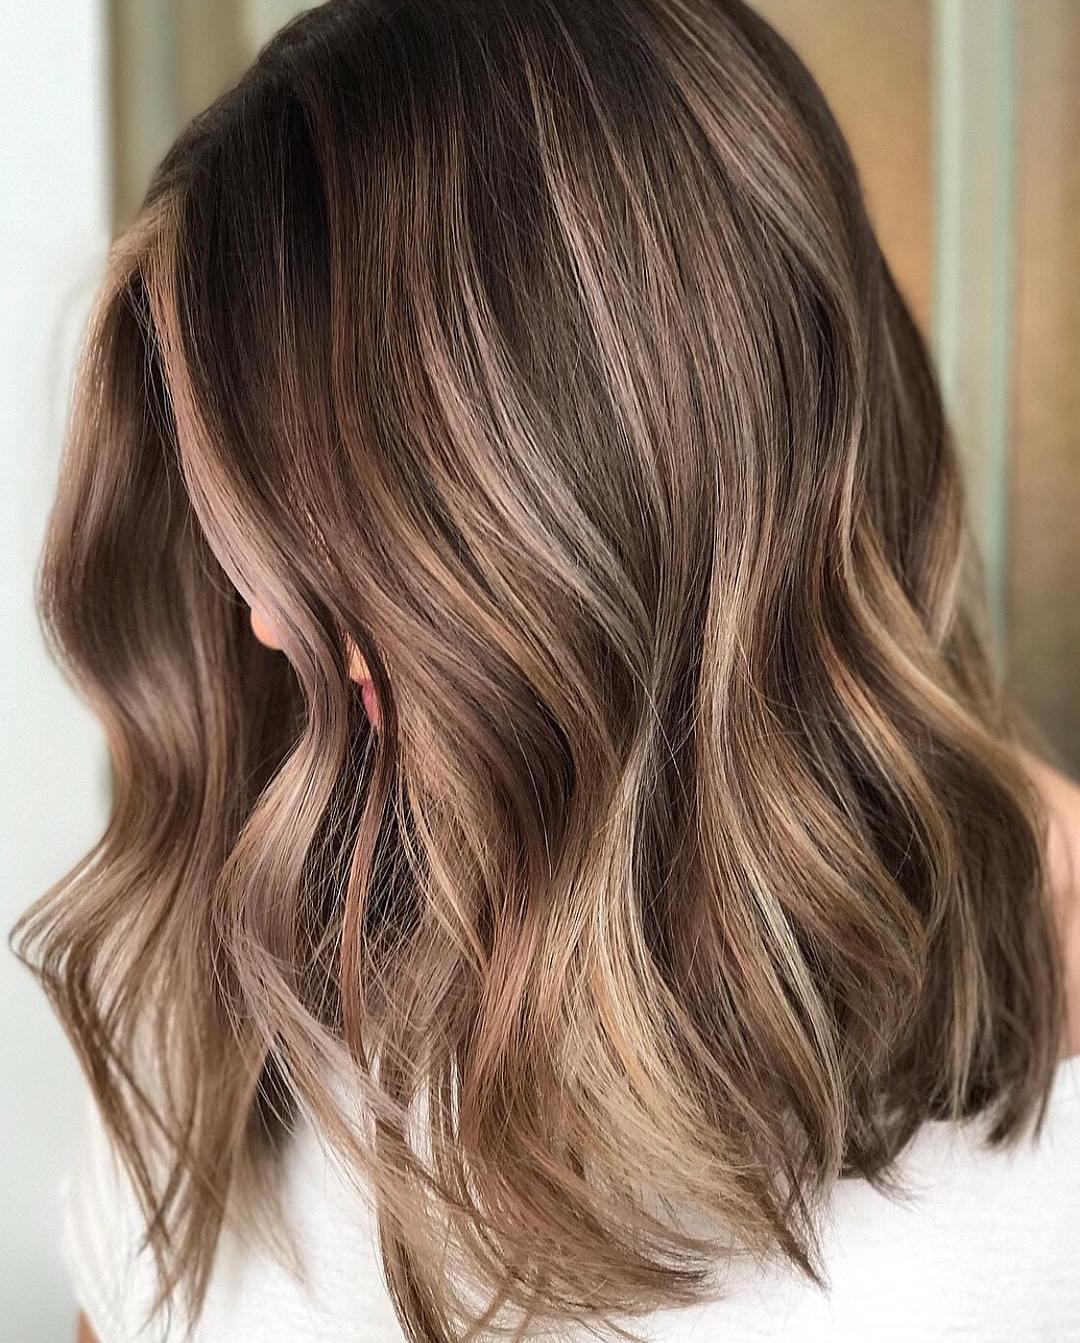
Image credit: therighthairstyles.com
The blending here is the point: caramel and blonde highlights melt into the dark brown base with no visible lines, which keeps the color soft even at collarbone length. The face-framing layers and curtain bangs add movement, so the highlights read as natural dimension rather than stripes.
This works on thick, wavy hair starting at the shoulders, and the face-framing layers suit most face shapes. Ask your colorist for: dark brown with blended caramel and blonde highlights, curtain bangs. To keep the blend intact, ask for: a diffuser on low heat for waves, and a trim every 6 to 8 weeks.
Mid-Back Dark Brown With Caramel Highlights

Source: therighthairstyles.com
Caramel and blonde highlights on dark brown hair can look harsh as they grow out. The answer is placement: the highlights here are prominent but distributed through the mid-lengths and ends, so the regrowth at the root stays soft. With no bangs, the face-framing layers brighten the front.
This cut works on thick, wavy hair that falls to mid-back, and the face-framing layers soften square and oval faces. Ask your colorist for: dark brown with prominent caramel and blonde highlights, face-framing layers. A texturizing spray enhances the waves, and a toning appointment every 6 to 8 weeks keeps the caramel from turning brassy.
Dark Brown With Honey Blonde Highlights, Mid-Back

Via campus.edu
The honey blonde highlights on a dark brown base deliver warmth without going full golden, and the wavy blowout makes the lighter pieces catch the light at every bend. This is a salon-built look: lifting a dark base to honey blonde at home is a gamble most people lose, so the honest trade-off is the chair time.
It’s a fit for thick, wavy hair starting at mid-back, and the middle part elongates round faces. Ask your colorist for: dark brown with honey blonde highlights, wavy blowout style. To maintain the blowout, use a round brush and blow dryer; a trim every 6 to 8 weeks keeps the ends clean.
Mid-Back Dark Brown With Subtle Caramel and Face-Framing Bangs
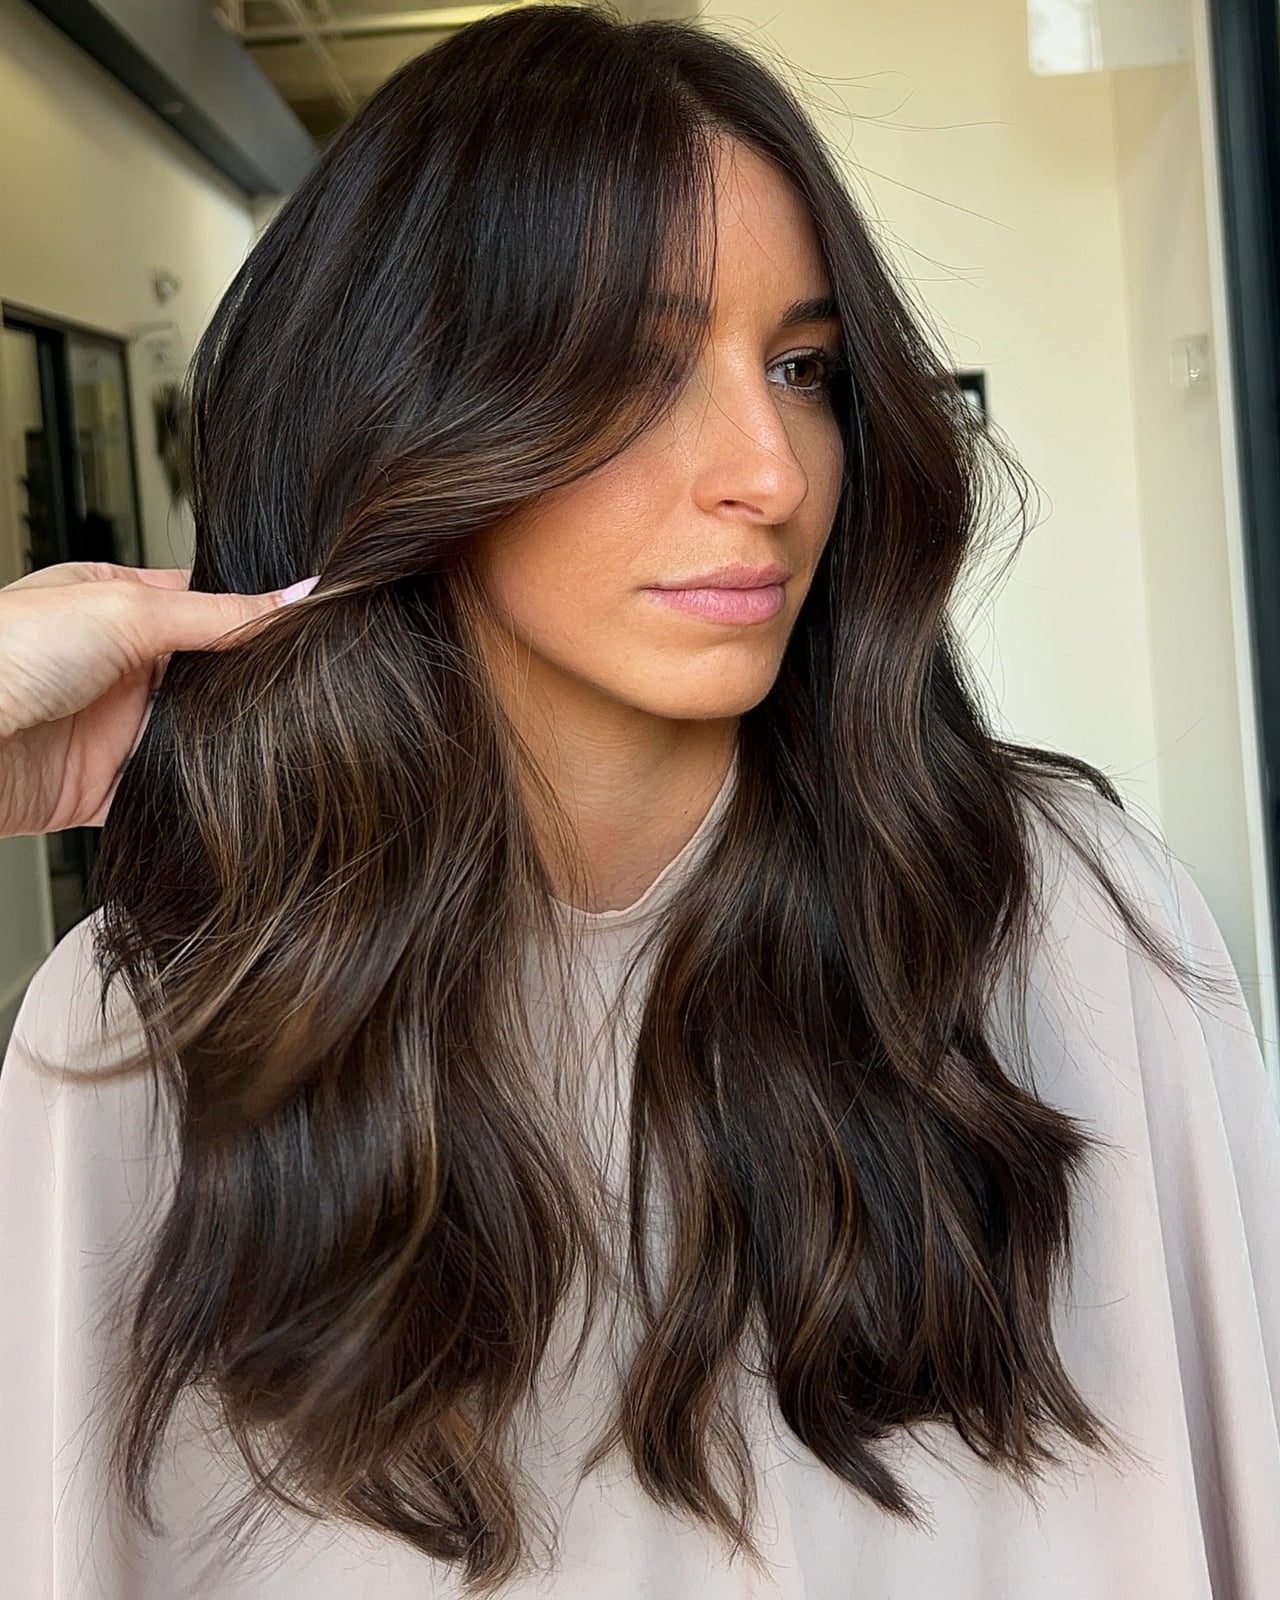
Courtesy of: creativebooster.net
A dark brown base with subtle caramel highlights and face-framing bangs softens a strong jawline or a wider forehead, which is why oval and heart-shaped faces wear it well. The bangs do the framing work while the caramel pieces add depth without a bold stripe. Mid-back length suits thick, wavy hair that already has movement; fine hair can look limp at this length unless the layers are kept light. Ask your colorist for: dark brown with subtle caramel highlights, face-framing bangs. Air dry with a curl cream to encourage the natural wave, and book a bang trim every four weeks to keep the shape sharp.
Thick Curly Dark Brown With Blonde Highlights

Photo credit: byrdie.com
Thick, curly hair holds highlights differently than straight hair: the light catches the curve of each ringlet, so a dark brown base with blonde pieces creates a halo of dimension rather than a flat streak. The technique here is a full head of foils, placed to follow the curl pattern so the blonde pops against the dark brown without looking striped. Mid-back length gives the curls room to spring up, and a middle part balances the volume on both sides. Ask your colorist for: dark brown with blonde highlights, natural curly texture. Styling starts with a microfiber towel to cut frizz, then a leave-in conditioner worked through the ends. A few steps to keep the curl definition:
- Apply leave-in conditioner to damp hair and scrunch upward.
- Let hair air dry or use a diffuser on low heat.
- Trim every eight to ten weeks to keep the shape.
Collarbone Lob With Platinum Highlights

Image credit: fabmood.com
Compare this with a softer caramel highlight and the difference is commitment: platinum on a black base is a salon appointment every four to six weeks to keep the tone from turning brassy, while caramel can stretch to eight. The collarbone lob with curtain bangs and bold face-framing platinum pieces is the choice for medium, wavy hair that wants a high-contrast edge. If your texture is fine or your budget is time, a softer highlight shade will be easier to live with. Ask your colorist for: black base with bold platinum highlights, collarbone lob, curtain bangs. The drawback is real: platinum needs a purple shampoo at home and a strict toning rhythm, or the contrast turns dull. Trim the blunt baseline every six to eight weeks.
Collarbone Waves With Face-Framing Highlights
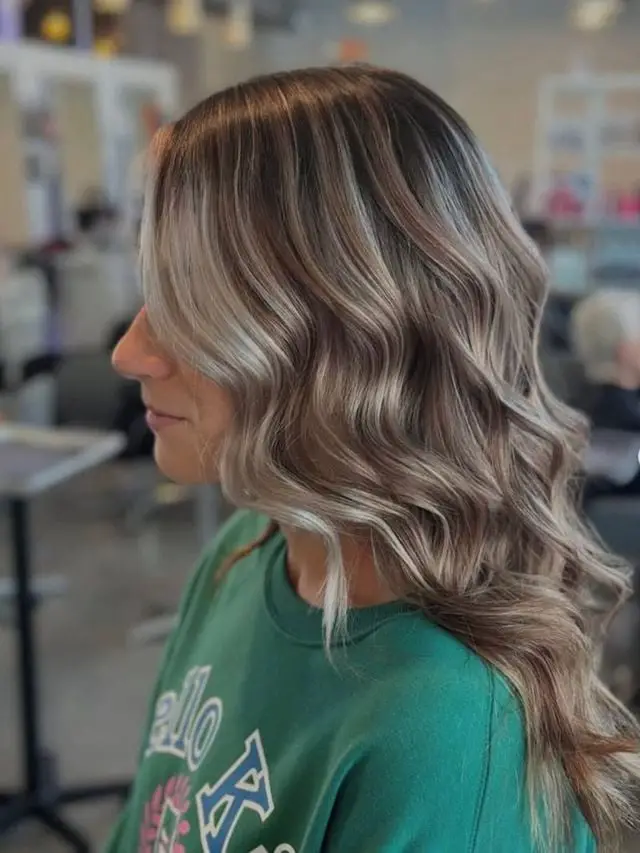
Source: luxelancaster.com
The face-framing pieces should start at the cheekbone and blend downward, not stop in a hard line. Ask your colorist for: medium brown with blonde highlights, collarbone length, curtain bangs. This works on medium-density, wavy hair that already holds a blowout; very fine hair may need fewer, thinner highlights to avoid a washed-out look. Style with a texturizing spray on damp hair and a round brush, and keep the baseline trimmed every six to eight weeks.
Warm Caramel With Subtle Blonde Highlights

Source: itakeyou.co.uk
A warm caramel base with subtle blonde highlights gives hair rich dimension, and the face-framing bangs and side parting keep the focus on that color. This is a strong pick for thick, wavy hair that can carry the volume of a blowout. It is also a natural fit for autumn and winter, when warmer tones feel less jarring than icy blondes. Ask your colorist for: warm caramel base with subtle blonde highlights, face-framing bangs. Blow-dry with a large round brush to lift the roots, and trim every six to eight weeks to keep the bangs and layers in shape.
Shoulder Length Light Brown With Blonde

Via wella.com
Blonde highlights on a light brown base create dimension without the high contrast of dark-to-light color. Fine, straight hair cut to the collarbone gains movement from the face-framing layers, which soften square and oval faces while keeping length. Ask your colorist for: light brown with subtle blonde highlights, collarbone length, face-framing layers. A flat iron on medium heat keeps the blowout smooth, and a trim every six to eight weeks prevents the layers from losing their shape. The grow-out is forgiving: the light base means new growth blends into a soft shadow instead of a hard line.
Collarbone Ash Blonde Highlights

Courtesy of: luxelancaster.com
Ash blonde highlights woven through a dark blonde base create a cool, smoky effect that reads as refined rather than brassy. Thick, wavy hair starting at the collarbone gives the curtain bangs and face-framing layers enough weight to hold their shape.
Ask your colorist for: dark blonde with ash blonde highlights, collarbone length, curtain bangs. The technique here is a foilyage, which places the lightener between foils for a more controlled, less streaky result. Upkeep requires:
- A purple shampoo used once a week to preserve the ash tone
- A gloss treatment every four to six weeks to keep the cool neutral from drifting warm
Shoulder Length Copper Highlights

Photo credit: moehair.com
Can copper highlights work on a brown base? Yes, when the copper is woven through the mid-lengths and ends in fine sections. Medium textured wavy hair cut to the shoulders holds the curl and lets the warm tones show. A middle part elongates a round face, so this is a solid pick for that shape. Ask your colorist for: brown base with copper highlights, shoulder length. The result is a warm, dimensional effect that suits autumn.
Wavy Face-Framing Highlights On Brown Base

Image credit: us.wella.professionalstore.com
Face-framing highlights do exactly what the name promises: they pull light toward the front of the hair, creating the illusion of a lifted shape. On a brown base, the blonde pieces are concentrated on the front sections, leaving the rest of the length untouched. Medium textured wavy hair works well here because the waves soften the transition between the highlighted pieces and the base. Ask your colorist for: brown base with face-framing blonde highlights. The key detail is placement: the highlights should start at the cheekbone, not the root, so the grow-out stays soft for about eight weeks.
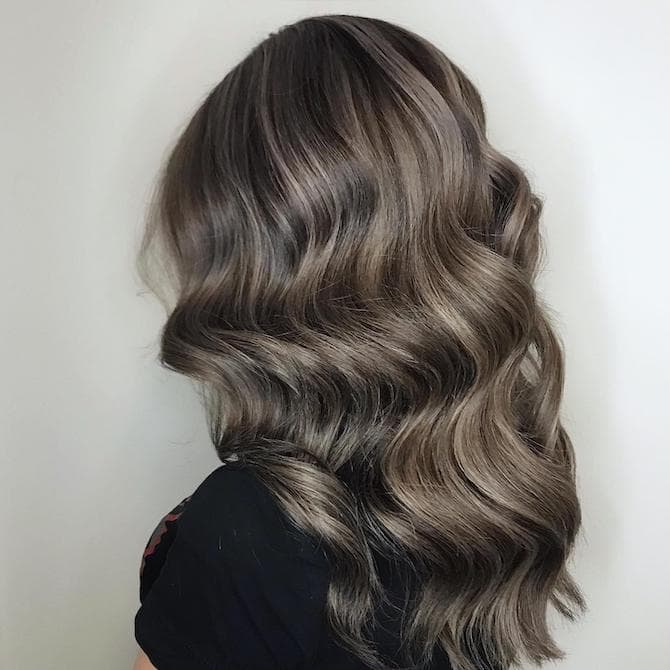
Mid-Back Gray Brown With Subtle Highlights
Source: us.wella.professionalstore.com
Ask your colorist for: gray brown base with subtle lighter highlights. Upkeep matters: use purple shampoo so the gray brown does not pull orange, and plan a toning appointment every four weeks to maintain the ashy quality. Without it, the subtle highlights can start to look dull instead of dimensional. Trims every eight to ten weeks keep the thick texture from widening at the ends.
Mid-Back Dark Blonde With Lighter Highlights

Via salonvoss.com
A dark blonde base with lighter blonde highlights works because the two shades sit close enough to blend and far enough apart to register. The lighter pieces are prominent here, not whispered, and they run through mid-back layers that are blown smooth with a soft wave left in. That combination of medium density and mid-back length gives the color somewhere to travel, so the dimension shows from the back as much as the front.
This one suits wavy hair of medium density that already reaches mid-back, and it rewards anyone who wants visible lift without a full bleach-out. Fine or very low-density hair can lose the contrast fast, and a shorter cut gives the highlights less room to graduate, so those cases are better served by a tighter placement. Ask your colorist for: dark blonde with lighter blonde highlights. A heat protectant before blow-drying keeps the finish clean, and a trim every six to eight weeks holds the layers in shape.
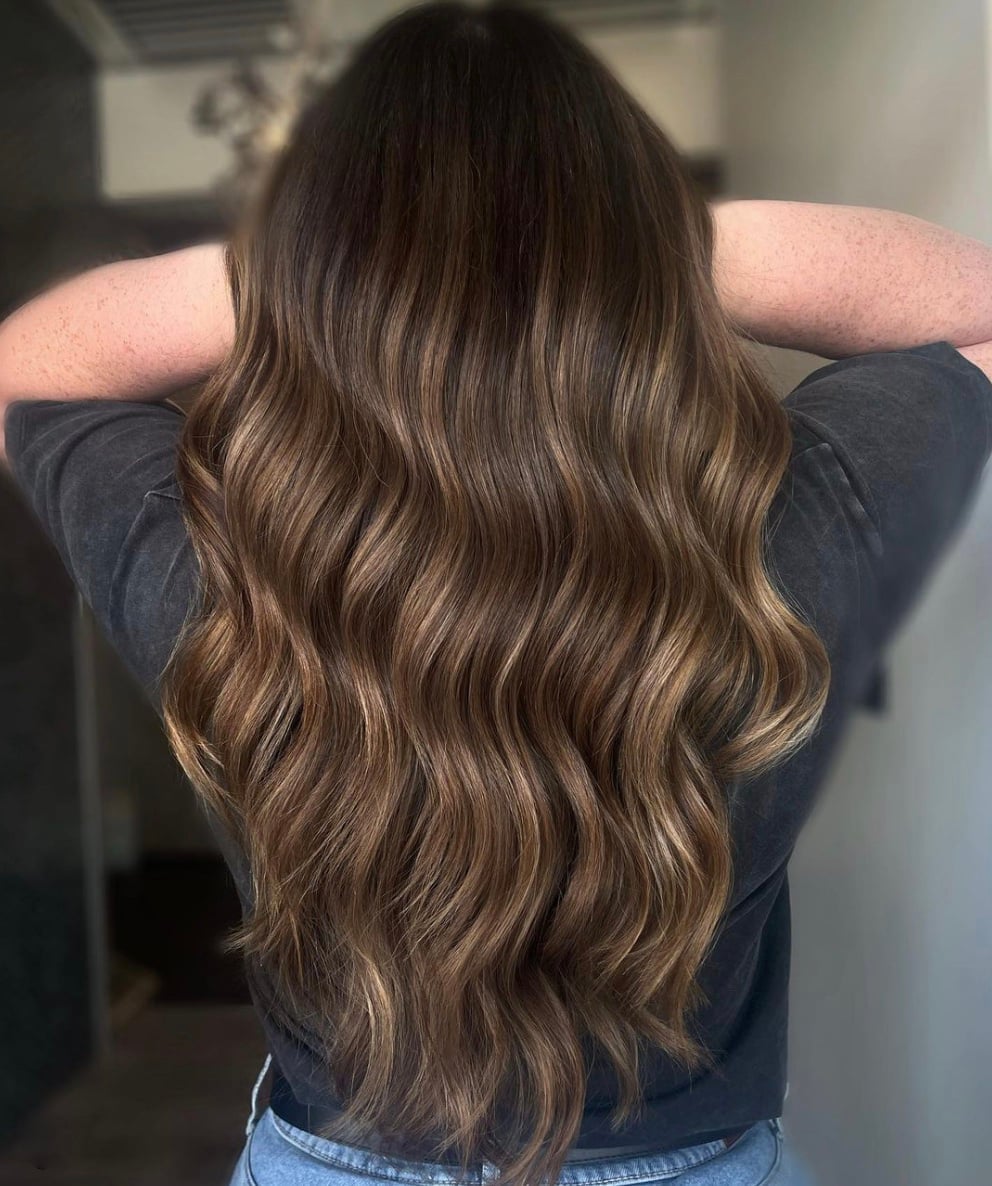
Mid-Back Dark Brown With Fine Blonde and Wavy Blowout
Courtesy of: pravana.com
Set this against chunky highlights and the difference is placement, not drama. Fine blonde highlights woven through a dark brown base read as sun-kissed rather than striped, and on thick, wavy mid-back layers the effect is glossy and healthy with real contrast at the root. Chunky sections make a bolder statement at the part; fine weaving keeps the grow-out quieter and the color looking like it happened on its own. If the goal is a visible shift, go chunky. If it is depth that survives a few months, go fine.
Thick, wavy hair starting at mid-back carries this best, since the texture breaks up the light pieces so nothing looks like a stripe. Weigh the time honestly: a full head of fine weaving is a long appointment and not a kitchen-sink project, so this is salon work. Ask your colorist for: dark brown with finely woven blonde highlights. A texturizing spray keeps the wavy blowout lived-in, and a trim every eight to ten weeks protects the ends.
Collarbone Dark Blonde With Subtle Highlights

Photo credit: matrix.com
How much upkeep does a highlight actually demand once the salon door closes? Less than the appointment suggests, when the tone stays this close to the base. These subtle blonde highlights sit just a shade or two off a dark blonde base, blended through collarbone layers and left air-dried with a middle part. Because the contrast is low, the root line stays soft and regrowth appears as shadow instead of a stripe. The middle part and length below the chin also elongate a round face, which is worth knowing before the cut.
Ask your colorist for: dark blonde with subtle blonde highlights. Medium density wavy hair at the collarbone takes the air-dried finish well. A lightweight styling product and a scrunch are enough on most days, and a trim every six to eight weeks keeps the ends from dragging the shape down.
Short Pixie Bob With Ash Blonde

Image credit: preview.ph
Ash blonde highlights on a grey base are a technical ask, since the two cool tones have to be placed so the highlight reads as light rather than a patch of color. On this ear-length pixie bob the pieces sit against fine, straight hair with side-swept bangs, and the cut is textured so the sections separate. Fine hair shows every tone shift, though, and ash blonde is the first to drift warm, so the look can go brassy within a few weeks without a toning appointment. Ask your colorist for: grey base with ash blonde highlights. A trim every four to six weeks keeps the shape sharp.
Final Thoughts
For a low-maintenance look, opt for balayage or babylights that blend seamlessly with your base color. Higher contrast styles require more frequent salon visits for touch-ups.
- Refresh highlights every 8-12 weeks depending on growth and desired contrast.
- Use color-safe shampoos and conditioners to preserve vibrancy.
- Incorporate a purple toning shampoo or mask once a month to combat brassiness.
- Minimize heat styling, and always use a heat protectant when necessary.
Highlights offer endless ways to refresh your look. Find the dimension that speaks to you.
-

 Makeup Trends2 years ago
29 Harley Quinn Makeup Ideas: Iconic Looks for Every Occasion
-

 Hairstyle2 years ago
Round Face Haircuts Ideas 2025: 29 Flattering Styles to Try
-

 Hairstyle2 years ago
25 90s Layered Hair Ideas to Inspire Your 2025 Look
-

 Fashion2 years ago
27 Every Day Spring Outfits Inspiration for 2025
-

 Hairstyle2 years ago
29 Long Layered Haircuts Ideas for 2025
-

 Hairstyle2 years ago
64 Fall Hair Color Trends to Elevate Your Style in 2024
-

 Hairstyle2 years ago
Choppy Bob Haircuts 2025: 29 Stylish Ideas
-

 Hairstyle2 years ago
27 Medium Length Haircut with Layers Ideas for 2025